Moodle
This page describes how to install an LTI® tool into Moodle. If you are looking for instructions on how to use Moodle itself as an LTI® tool, please follow this guide on using the LTIAAS Moodle plugin.
The Moodle LMS supports two different registration methods: dynamic registration and manual registration. This guide covers both methods.
Dynamic Registration
Dynamic Registration is available in version 3.10 or higher of Moodle.
Make sure that Dynamic Registration for your LTIAAS API is enabled during the LTIAAS onboarding process.
Summary
To set up LTIAAS with Moodle using dynamic registration, you need to:
Step 1. Add a new 'LTI Advantage' tool in your Moodle installation
- Login to your Moodle installation as an administrator.
- Navigate to 'Site administration' -> 'Plugins' -> 'Activity modules' -> 'External tool' -> 'Manage tools'
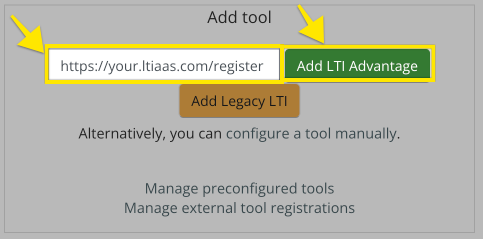
- In the
Tool Urlfield enter:https://your.ltiaas.com/lti/register, whereyouris the custom subdomain set up in the LTIAAS portal. - Click the
Add LTI® Advantagebutton
Once the tool is registered, you can view and activate/deactivate the registration in the LTIAAS portal.
Step 2. Do a test launch
Adding your tool to a course in Moodle is slightly different depending on which version of Moodle that you are using.
Manual Registration
Summary
To set up LTIAAS with Moodle using manual registration, you need to:
- Create a new tool in the Moodle installation
- Register the Moodle installation inside LTIAAS
- Do a test launch
Step 1. Create a new 'External Tool' in your Moodle installation
- Login to your Moodle installation as an administrator.
- Navigate to 'Site administration' -> 'Plugins' -> 'Activity modules' -> 'External tool' -> 'Manage tools'
- Click the 'configure a tool manually' link

- In the resulting form. configure the tool with the following information:
- Tool name:
Your Tool Name - Tool URL:
https://your.ltiaas.com/lti/launch - Tool description:
Your Tool Description - LTI® version:
LTI® 1.3 - Public key type:
Keyset URL - Public keyset:
https://your.ltiaas.com/keys - Initiate login URL:
https://your.ltiaas.com/login - Redirection URI(s):
https://your.ltiaas.com/lti/launch - Tool configuration usage:
Show in activity chooser as a preconfigured tool - Default launch container: (your choice)
- Supports Deep Linking (Content-Item Message):
CHECKED\<- This is needed if the LTIAAS deep linking service is going to be used. Otherwise leave it unchecked. - Content Selection URL: (left blank)
- Icon URL:
https://your-webiste.com/<icon.png> - Secure icon URL:
https://your-website.com/<icon.png> - IMS LTI® Assignment and Grade Services:
Use this service for grade sync and column management<- This is needed if the LTIAAS assignments and grades service is going to be used. - IMS LTI® Names and Role Provisioning:
Use this service to retrieve members' information as per privacy settings<- This is needed if the LTIAAS names and roles service is going to be used. - Tool Settings: Use this service
- Share launcher's name with tool:
Delegate to teacher (recommended) - Share launcher's email with tool:
Delegate to teacher (recommended) - Accept grades from the tool:
Delegate to teacher (recommended) - Force SSL:
CHECKED
- Tool name:
NOTE: When using LTIAAS, the Content Selection URL should be left blank. This URL is configured within the LTIAAS setup.


- Click the 'Save changes' button at the bottom when the form is filled. You can always go back and change this form later if you need to.
- After saving, find the tool on the list of tools and click the button that has 4 horizontal lines.
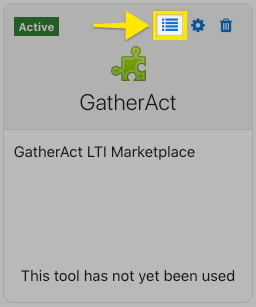
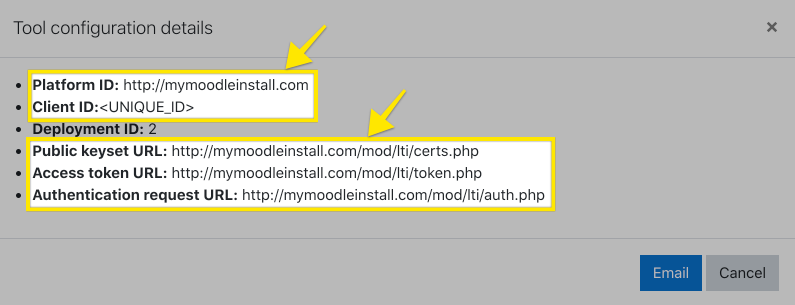
- A dialog should pop up that shows the information that you need to provide to LTIAAS. Save this for the next step.
Step 2. Register the Moodle installation inside LTIAAS
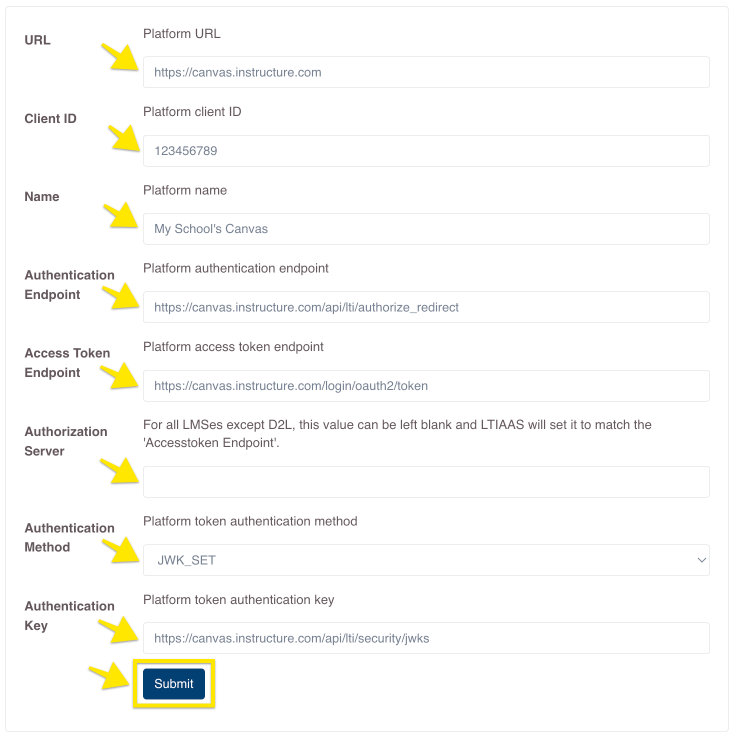
A registration can be done from within the LTIAAS Portal. Start by logging in to your account and navigating to the Registrations page. Then click on the + Add Registration button.

Enter the information that the LMS provides for its LTI® endpoints using the table below as a guide.
| LTIAAS Registration API Name | Moodle Provided Name |
|---|---|
| Name | Any name you would like that helps you identify your LMS |
| Client ID | Client ID |
| URL | Platform ID |
| Authentication Method | JWK_SET |
| Authentication Key | Public Keyset URL |
| Access Token Endpoint | Access Token URL |
| Authentication Endpoint | Authentication Request URL |
Click submit when you have made the necessary changes. Also, you can edit these values at any time.
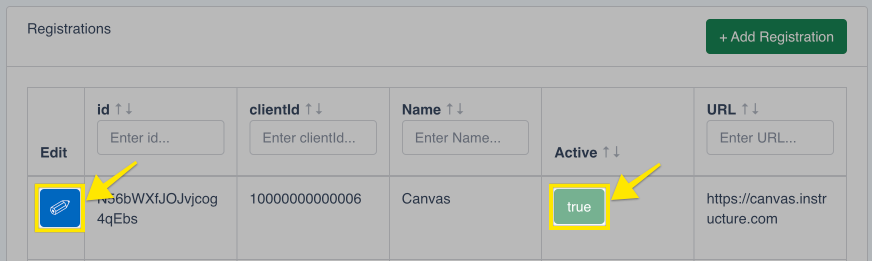
Step 3. (Optional) Edit the registration
If at any time you want to edit or delete a registration, simply click on the blue pencil icon on the leftmost column of the table for the registration item you want to change.
By default, all new registrations are activated upon creation. There may be an instance where a platform was registered, but you don't want the registration to be active. You can activate/deactivate a registration by clicking on the true/false button on the Active column of the table.
Step 4. Do a test launch
Adding your tool to a course in Moodle is slightly different depending on which version of Moodle that you are using.
Launching in Moodle 3.x
If you set Tool configuration usage = Show in activity chooser as a preconfigured tool when the tool was installed, you can select the tool easily when adding an activity:
- In the Moodle installation, go to a course and turn editing on.
- Press the "Add and activity or resource" link in one of the section of the course.
- Select the newly created tool.
- Give the Activity a name, set any other options to your liking, and click 'Save and display'
- If the setup was successful, you should see the new tool launch successfully.
If you (or the Moodle administrator) set Tool configuration usage to a different value, you will have ot go through an extra step when adding the tool to the course:
- In the Moodle installation, go to a course and turn editing on.
- Press the "Add and activity or resource" link in one of the section of the course.
- Select 'External Tool'
- Select your tool from the 'Preconfigured Tool' list
- Give the Activity a name, set any other options to your liking, and click 'Save and display'
- If the setup was successful, you should see the new tool launch successfully.
If your tool has deeplinking configured, you can launch the deeplinking view by clicking the Select Content button before saving/displaying the tool. Otherwise, after you save, the tool will only launch to the default launch URL.
Launching in Moodle 4.x
Adding a tool to a course in Moodle 4.x is a little bit more complicated than Moodle 3.x, as you have to first allow the tool to be used globally within the course before adding it as an activity. This is done by:
Navigate to the course home page and click 'More' -> 'LTI® External Tools'
LTI® External Tools menu item within a Moodle course
In the resulting screen, toggle the appropriate 'Show activity in chooser' to the enabled position for the tool you want this course to have access to.
Available LTI® External Tools that can be enabled in a Moodle course
Once the above steps are done, you can proceed in adding the tool as an activity in the course.
- In the Moodle installation, go to a course and turn editing on.
- Press the "Add and activity or resource" link in one of the section of the course.
- Select the newly created tool.
- Give the Activity a name, set any other options to your liking, and click 'Save and display'
- If the setup was successful, you should see the new tool launch successfully.
Unlike Moodle 3.x, in Moodle 4.x if your tool has deeplinking configured, you are required to execute deeplinking by clicking the Select Content button during step 4 above. There is no way to launch the default launch URL if deeplinking is enabled.
Next steps
Now that you have your LTI® tool set up in an LMS, you can start receiving LTI® launches. Please see the Receiving your first LTI® launch guide for more information.