Brightspace
The Brightspace LMS supports two different registration methods: dynamic registration and manual registration. This guide covers both methods.
Dynamic Registration
The easiest way to register an LTIAAS tool with Brightspace is with Dynamic Registration.
Make sure that Dynamic Registration for your LTIAAS API is enabled during the LTIAAS onboarding process.
Summary
To set up LTIAAS with Brightspace using Dynamic Registration, you need to:
Step 1. Register a new tool in your Brightspace installation
- Login to the Brightspace installation as an administrator.
- Navigate to 'Admin Tools (Gear Icon)' -> 'Manage Extensibility'Brightspace manage extensibility menu

- Click the 'LTI® Advantage' tab, then the 'Register Tool' button Brightspace LTI® advantage tab with register tool button highlighted

- Choose
Dynamicregistration, click Register. - In the resulting form, configure the tool with the following information:
- Dynamic:
CHECKED - Tool initiation registration endpoint:
https://your.ltiaas.com/lti/registerBrightpsace dynamic register a tool form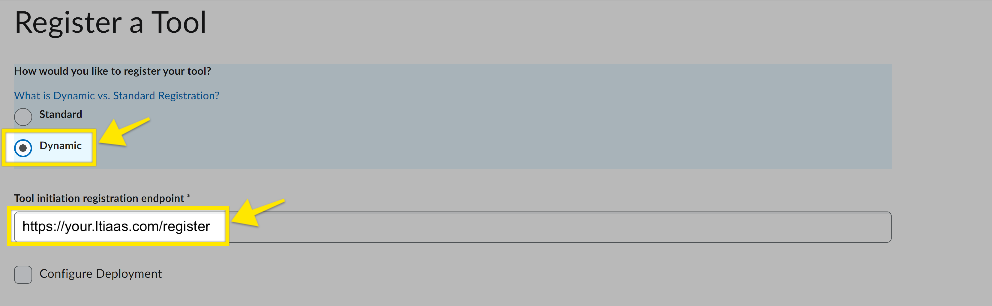
- Dynamic:
- It is recommended to review the Extensions, Parameters, and Security Settings (in the deployment if applicable) that the tool has asked for to ensure they meet your organization's use cases.
- Submit the form
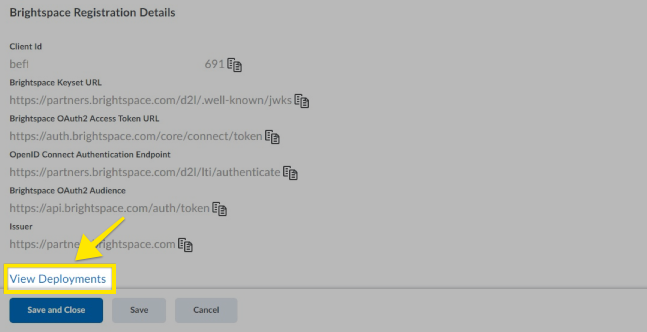
Step 2. Do a test launch
- In the Brightspace installation, on the page we left off with when registering the tool, click the 'View Deployments' link near the bottom of the page.Brightspace view deployments page
- Click the 'New Deployment' button.Brightspace new deployment button

- In the resulting form, enter the following:
- Enabled:
CHECKED - Tool: Select your tool from the dropdown list
- Name:
Your Tool Name - Description:
Your Tool Description - Extensions:
CHECKED<- For each service you plan to use. - Security Settings:
CHECKED<- Select as little as possible to avoid passing sensitive user information to your tool.
- Enabled:
- Click the 'Add Org Units' button and in the popup, select which organizations/users should have access to the tool.
- Click the 'Save and Close' button to save the deployment.Brightspace new deployment form

- Go back into the deployment form and click the 'View Links' link at the bottom of the form.
- In the Links page, click the 'New Link' buttonBrightspace new link button

- Fill in the resulting form as follows:
- Enabled:
CHECKED - Name:
Your Tool Name - URL:
https://your.ltiaas.com/lti/launch<- Note: if using deep linking but with no content selection screen, you can pass a manually generated deep linking URL here instead. - Description:
Your Tool Description - Type: Select the way you want the tool to show to the user.Brightspace new link form

- Enabled:
- Click the 'Save and Close' button.
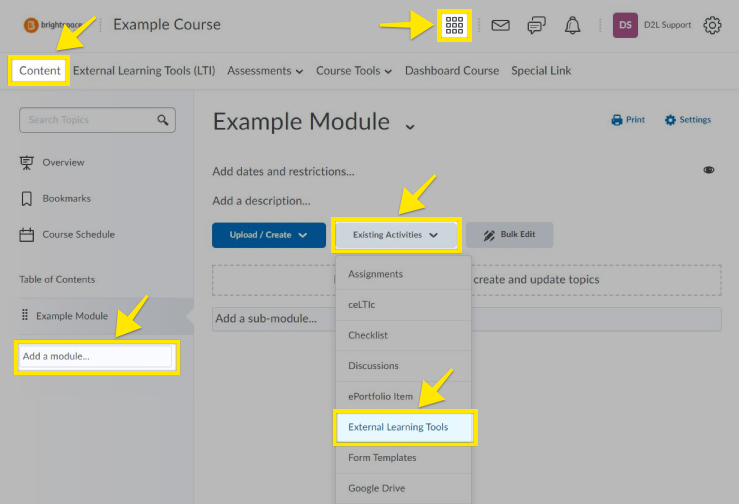
- Click on the grid icon at the top of the page and navigate to a course, then click the 'Content' tab, and click the 'Add a Module' input box. In the box, give the module a name you prefer.
- Once the module is created, click the 'Existing Activities' button and select 'External Learning Tools' option. Brightspace add activity to course
- In the resulting dialog, find your tool name on the list and click it.
- Finally, a link should have been created in the course module page. Click it to launch the tool.Brightspace final link within course

Manual Registration
Summary
To set up LTIAAS with Brightspace using Manual Registration, you need to:
- Create a new tool in the Brightspace installation
- Register the Brightspace installation inside LTIAAS
- Do a test launch
Step 1. Create a new tool in your Brightspace installation
- Login to your Brightspace installation as an administrator.
- Navigate to 'Admin Tools (Gear Icon)' -> 'Manage Extensibility'Brightspace manage extensibility menu item
- Click the 'LTI® Advantage' tab, then the 'Register Tool' button Brightspace LTI® advantage register tool button
- Choose
Standardregistration, then click Register. - In the resulting form, configure the tool with the following information:
- Enabled:
CHECKED - Name:
Your Tool Name - Description:
Your Tool Description - Domain:
https://your.ltiaas.com/lti/launch - Redirection URLs:
https://your.ltiaas.com/lti/launch - OpenID Connect Login URL:
https://your.ltiaas.com/login - Keyset URL:
https://your.ltiaas.com/keys - Extensions:
CHECKED<- For each service you plan to use. - Roles:
CHECKED<- If you plan to use this information in you tool.
- Enabled:
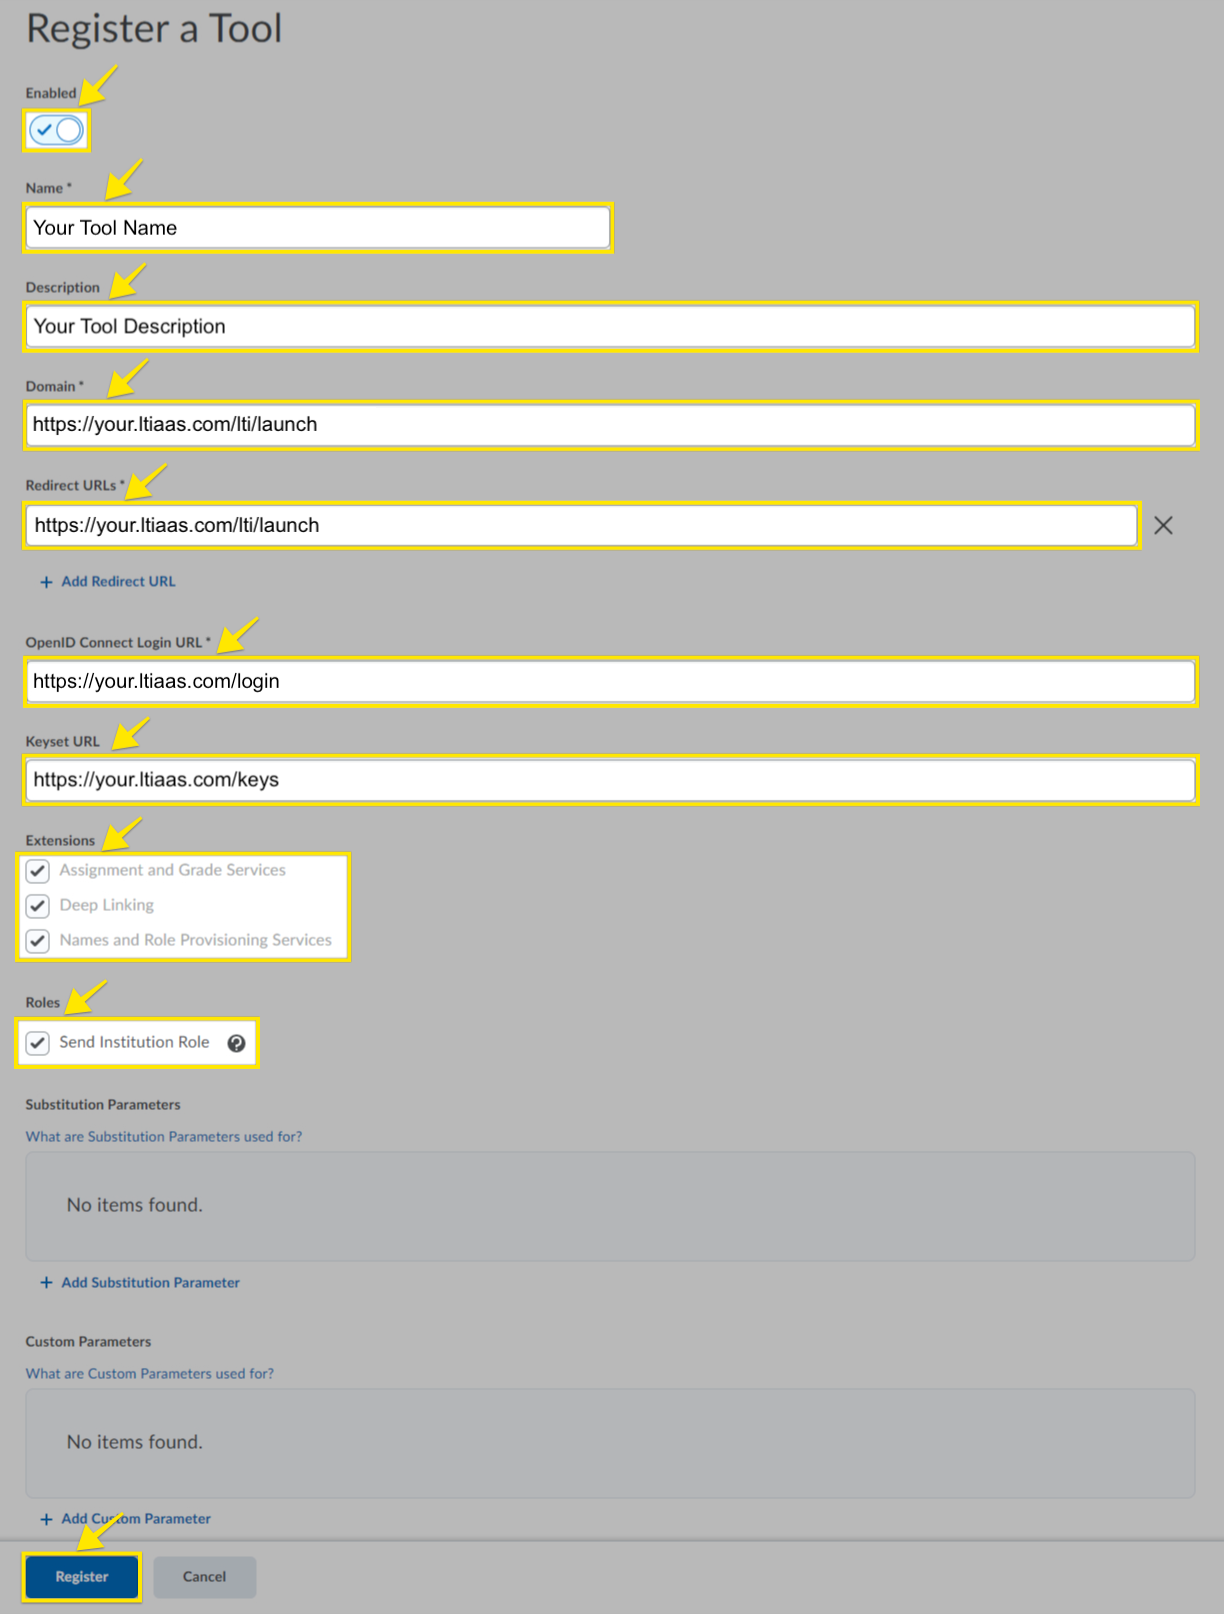
Click the 'Register' button at the bottom when the form is filled. You can always go back and change this form later if you need to.
After saving, scroll down to the bottom of the registration page to find the registration details that need to be entered into LTIAAS.
Brightspace registration details (to be used in step 2)
Step 2. Register The Brightspace Installation Inside LTIAAS
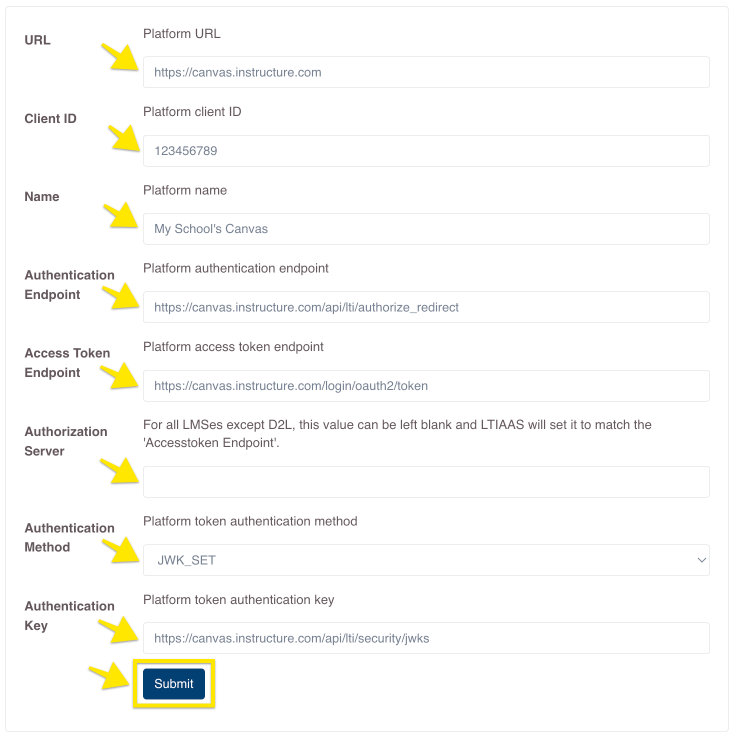
A registration can be done from within the LTIAAS Portal. Start by logging in to your account and navigating to the Registrations page. Then click on the + Add Registration button.

Enter the information that the LMS provides for its LTI® endpoints using the table below as a guide.
| LTIAAS Registration API Name | Brightspace Provided Name |
|---|---|
| Name | Any name you would like that helps you identify your LMS |
| Client ID | Client ID |
| URL | Issuer |
| Authentication Method | JWK_SET |
| Authentication Key | Brightspace Keyset URL |
| Access Token Endpoint | Brightspace OAuth2 Access Token URL |
| Authentication Endpoint | OpenID Connect Authentication Endpoint |
| Authorization Server | Brightspace OAuth Audience |
Click submit when you have made the necessary changes. Also, you can edit these values at any time.
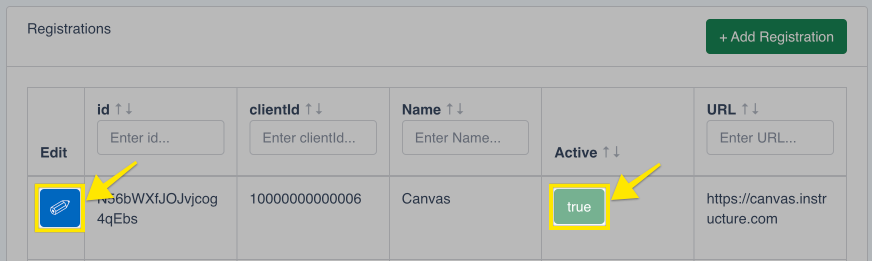
Step 3. (Optional) Edit the registration
If at any time you want to edit or delete a registration, simply click on the blue pencil icon on the leftmost column of the table for the registration item you want to change.
By default, all new registrations are activated upon creation. There may be an instance where a platform was registered, but you don't want the registration to be active. You can activate/deactivate a registration by clicking on the true/false button on the Active column of the table.
Step 4. Do a test launch
- In the Brightspace installation, on the page we left off with when registering the tool, click the 'View Deployments' link near the bottom of the page.Brightspace view deployments page
- Click the 'New Deployment' button.Brightspace new deployment button
- In the resulting form, enter the following:
- Enabled:
CHECKED - Tool: Select your tool from the dropdown list
- Name:
Your Tool Name - Description:
Your Tool Description - Extensions:
CHECKED<- For each service you plan to use. - Security Settings:
CHECKED<- Select as little as possible to avoid passing sensitive user information to your tool.
- Enabled:
- Click the 'Add Org Units' button and in the popup, select which organizations/users should have access to the tool.
- Click the 'Save and Close' button to save the deployment.Brightspace new deployment form
- Go back into the deployment form and click the 'View Links' link at the bottom of the form.
- In the Links page, click the 'New Link' buttonBrightspace new link button
- Fill in the resulting form as follows:
- Enabled:
CHECKED - Name:
Your Tool Name - URL:
https://your.ltiaas.com/lti/launch<- Note: if using deep linking but with no content selection screen, you can pass a manually generated deep linking URL here instead. - Description:
Your Tool Description - Type: Select the way you want the tool to show to the user.Brightspace new link form
- Enabled:
- Click the 'Save and Close' button.
- Click on the grid icon at the top of the page and navigate to a course, then click the 'Content' tab, and click the 'Add a Module' input box. In the box, give the module a name you prefer.
- Once the module is created, click the 'Existing Activities' button and select 'External Learning Tools' option. Brightspace add activity to course
- In the resulting dialog, find your tool name on the list and click it.
- Finally, a link should have been created in the course module page. Click it to launch the tool.Brightspace final link within course
Next steps
Now that you have your LTI® tool set up in an LMS, you can start receiving LTI® launches. Please see the Receiving your first LTI® launch guide for more information.