Blackboard
Manual Registration
The Blackboard LMS only supports manual tool registration, not Dynamic Registration. This guide explains how to manually register an LTIAAS tool with Blackboard.
Summary
To set up LTIAAS with Blackboard you need to:
- Install the LTIAAS tool into Blackboard for all tenants
- Register the Blackboard provided details into LTIAAS
- Install the LTIAAS tool into Blackboard
- Set up a placement for the LTIAAS tool
- Do a test launch
Step 1. Install the LTIAAS tool into Blackboard for all tenants
Blackboard uses a concept called 'multi-tenancy'. This allows an LTI® tool to be registered once within Blackboard.com and is then made available to all Blackboard "tenants". So, a tool registration is not done for each LMS instance, but only once at https://developer.blackboard.com, then made available by Blackboard to all instances.
Navigate to to https://developer.blackboard.com and sign up and/or sign in.
Click on “My Applications”, then click “Register a REST or LTI® application”.
The "My Applications" page at developer.blackboard.com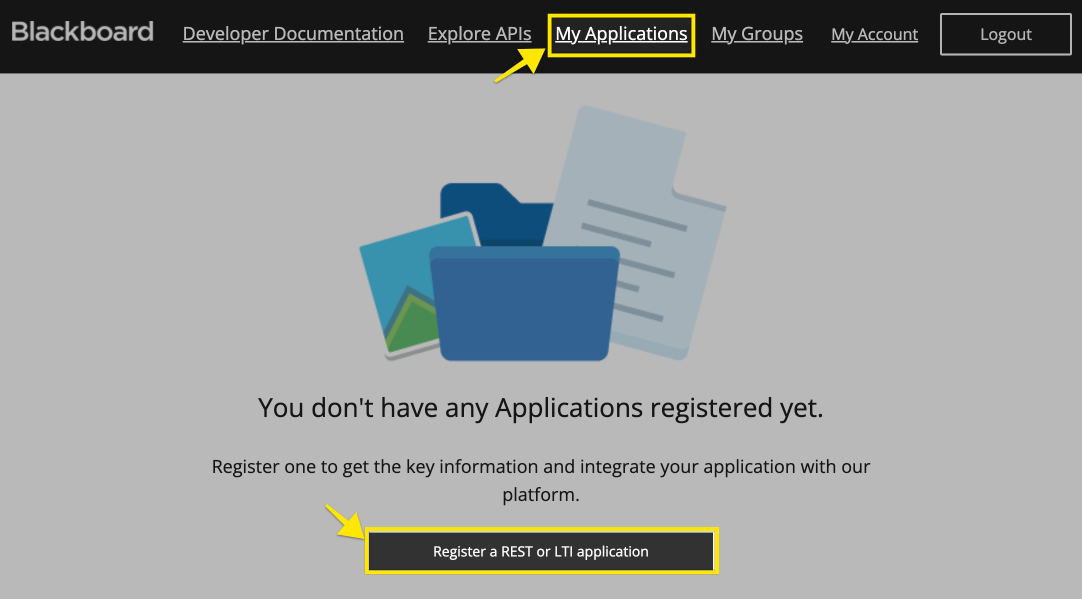
Fill in the form with the details below:
- Application Name:
Your Tool Name - Description:
Your Tool Description - Domain(s):
your.ltiaas.com - Group: (your choice) <- This is only for organizing apps within your Blackboard Developer account.
- My Integration supports LTI® 1.3:
CHECKED - Login Initiation URL:
https://your.ltiaas.com/login - Tool Redirect URL(s):
https://your.ltiaas.com/lti/launch - Tool JWKS URL:
https://your.ltiaas.com/keys - Signing Algorithm:
RS256
- Application Name:
Click the 'Register Application' button.
Blackboard register application form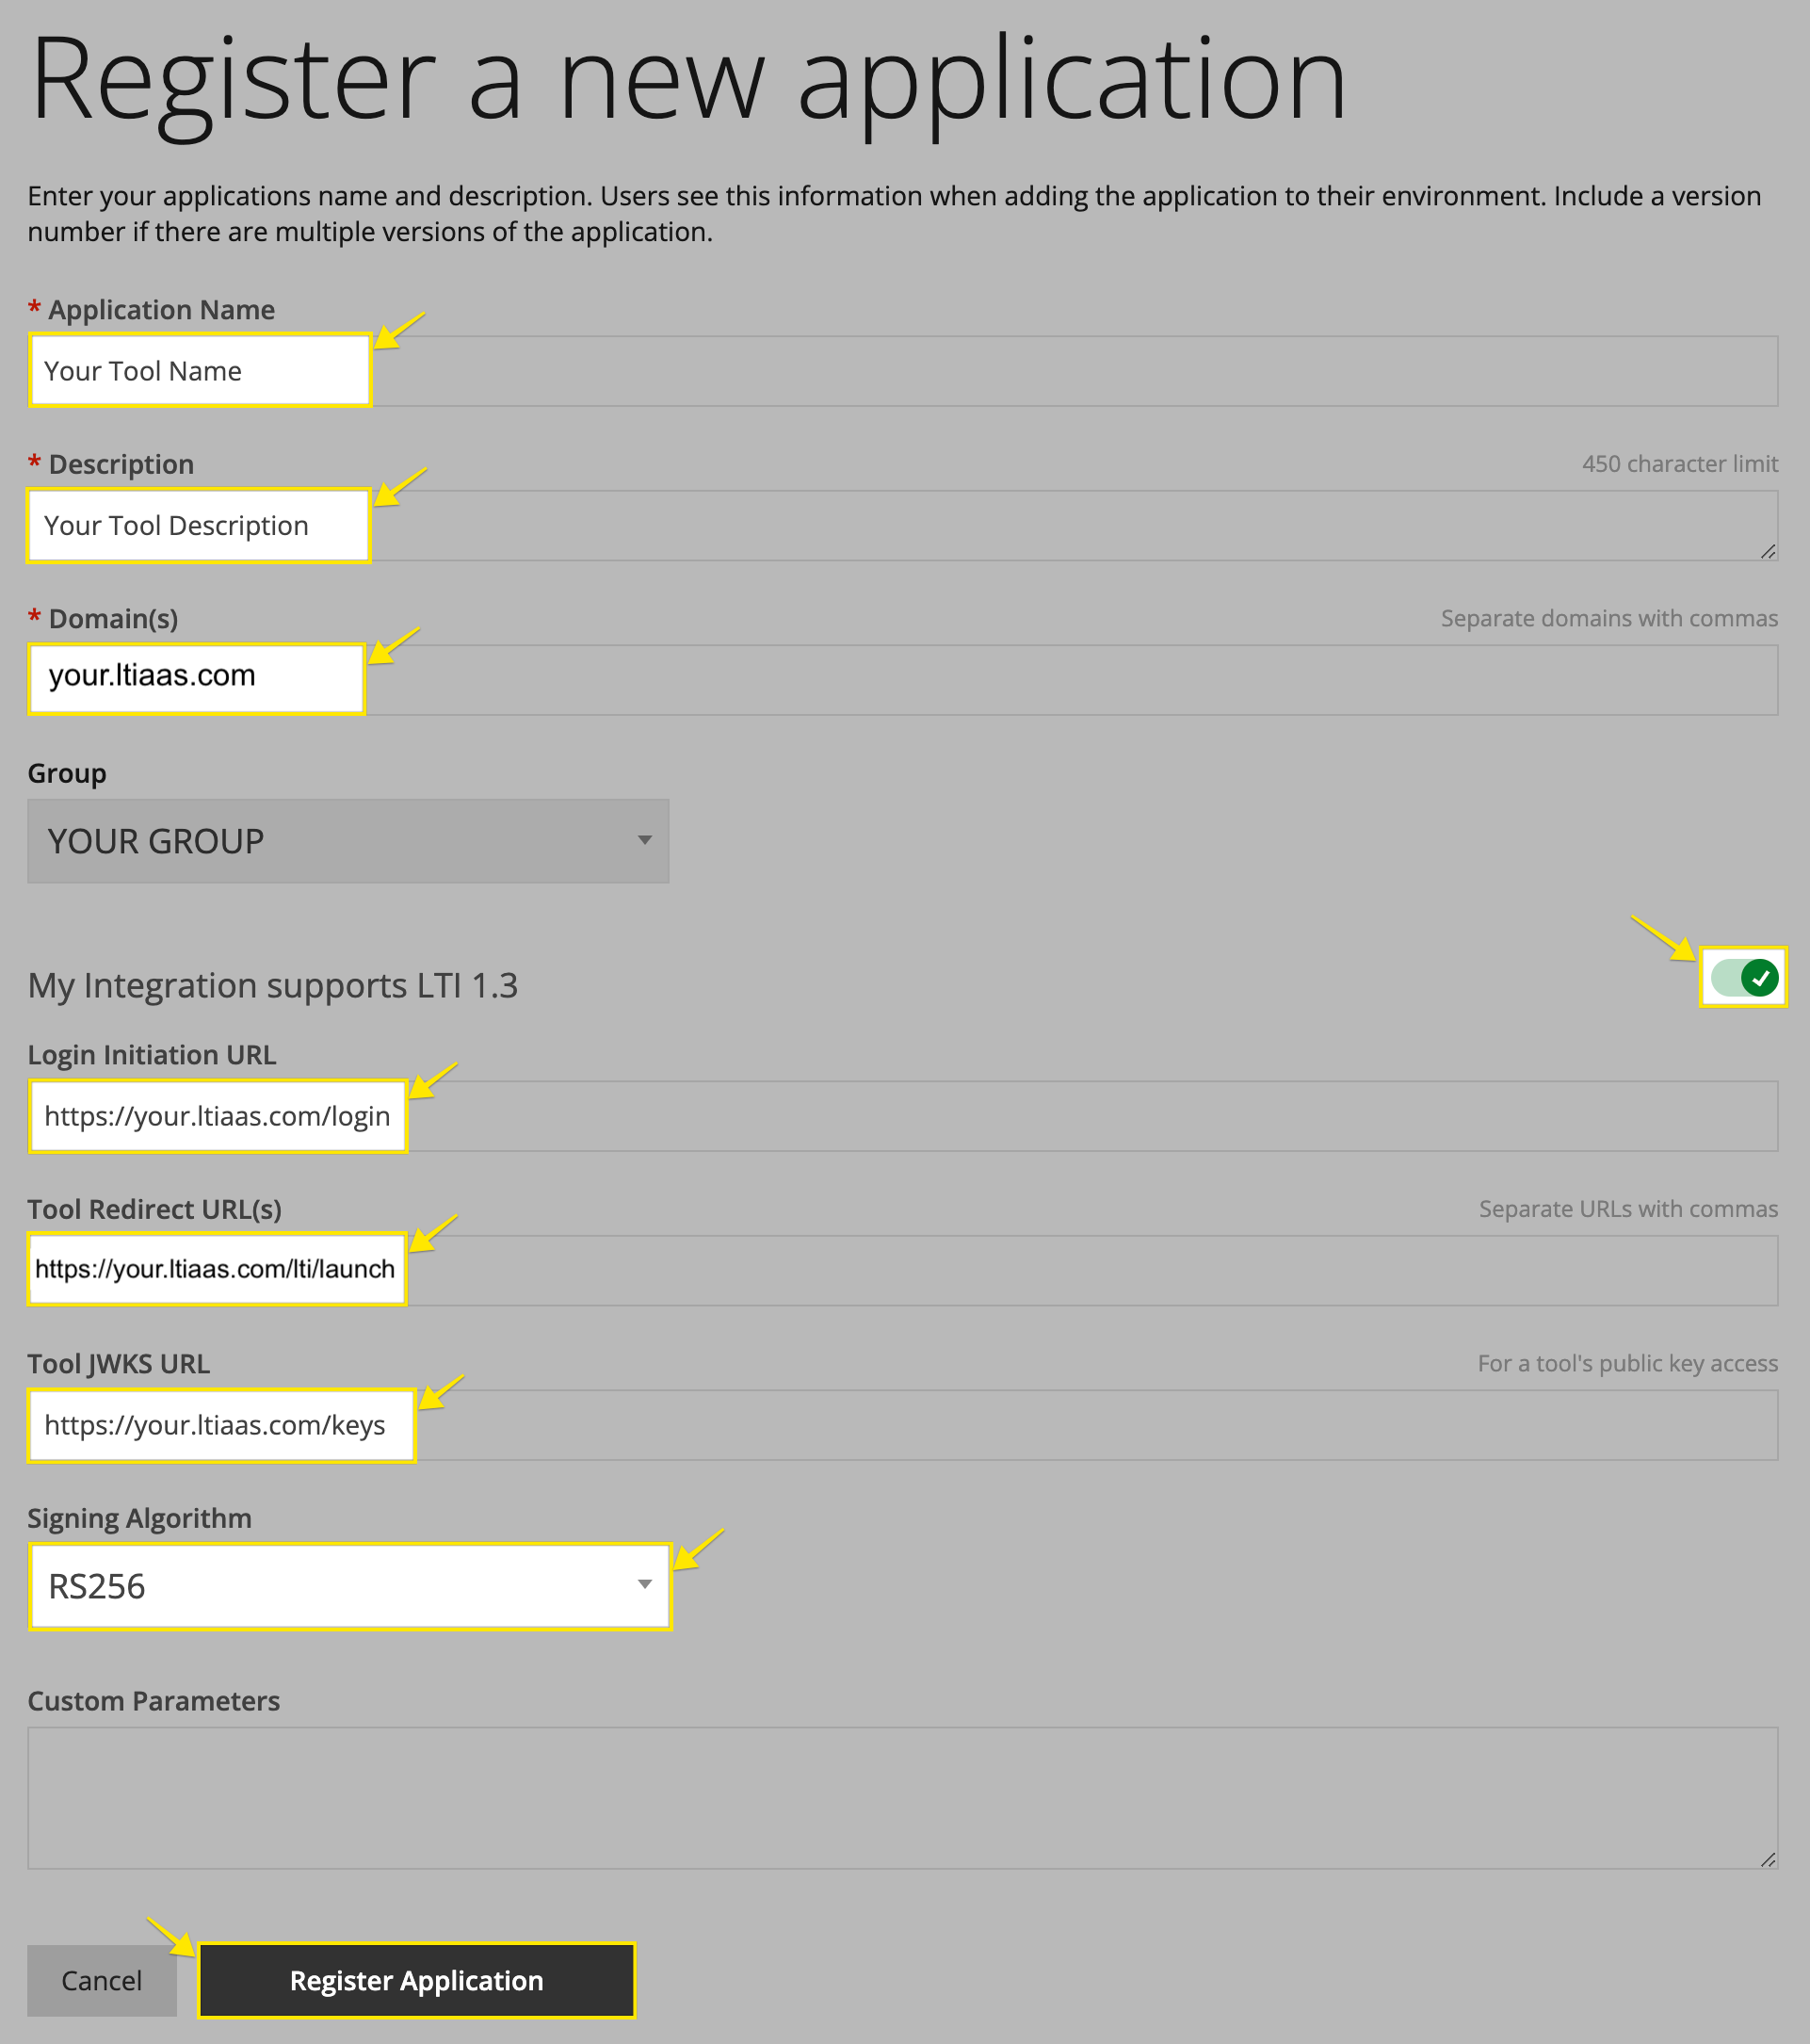
After the Blackboard registration process is complete, the blackboard endpoints for this tool are made available. Copy the following values that will be used in the LTIAAS registration:
- Application ID
- Issuer
- Public keyset URL
- Auth token endpoint
- OIDC auth request endpoint

Step 2. Register the Blackboard provided details into LTIAAS
A registration can be done within the LTIAAS Portal. Start by logging in to your account and navigating to the Registrations page. Then click on the + Add Registration button.

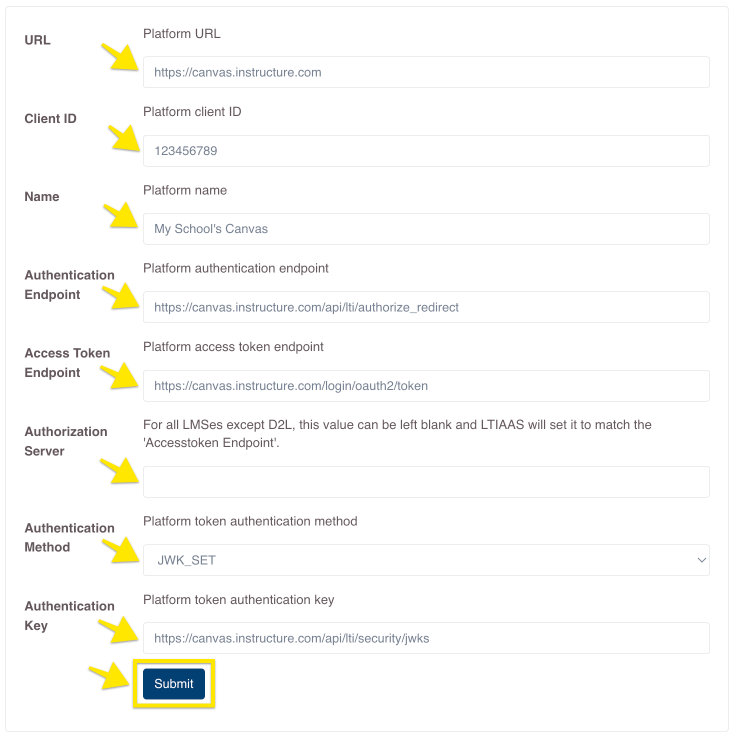
Enter the information that the LMS provides for its LTI® endpoints using the table below as a guide.
| LTIAAS Registration API Name | Blackboard Provided Name |
|---|---|
| Name | Any name you would like that helps you identify the LMS |
| Client ID | Application ID |
| URL | Issuer |
| Authentication Method | JWK_SET |
| Authentication Key | Public keyset URL |
| Access Token Endpoint | Auth token endpoint |
| Authentication Endpoint | OIDC auth request endpoint |
Click submit when you have made the necessary changes. Also, you can edit these values at any time.
Step 3. (Optional) Edit the registration
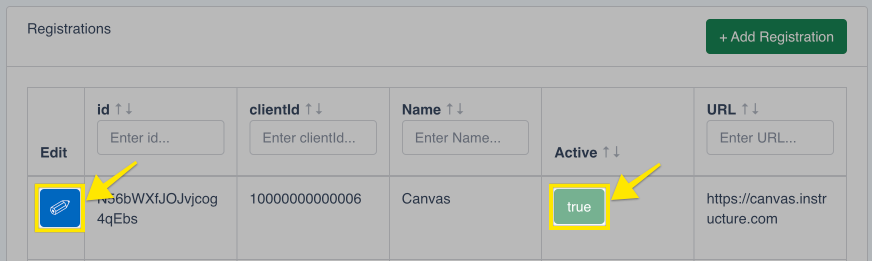
If at any time you want to edit or delete a registration, simply click on the blue pencil icon on the leftmost column of the table for the registration item you want to change.
By default, all new registrations are activated upon creation. There may be an instance where a platform was registered, but you don't want the registration to be active. You can activate/deactivate a registration by clicking on the true/false button on the Active column of the table.
Step 4. Install LTIAAS Tool into Blackboard
- Login to the Blackboard LMS as an administrator and click on the 'System Admin' menu button System admin button within blackboard LMS

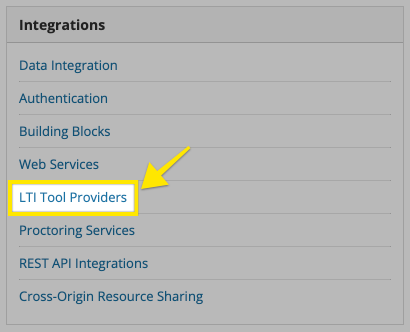
- Navigate to 'Integrations' -> 'LTI® Tool Providers' LTI® tool providers link
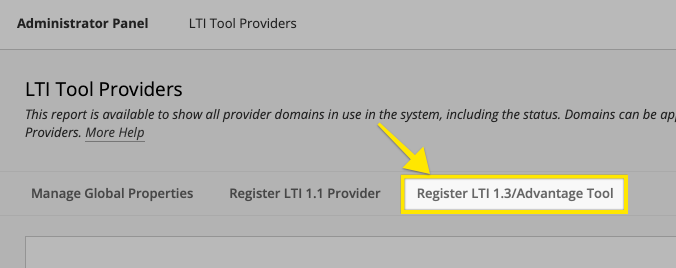
- In the resulting 'LTI® Tool Providers' page, click 'Register LTI® 1.3/Advantage Tool' Register LTI® 1.3/Advantage tool tab
- In the resulting page you will be prompted to enter a client ID.
enter theClient IDthat was created in step 1, then click 'Submit'.Register LTI® 1.3/Advantage tool initial form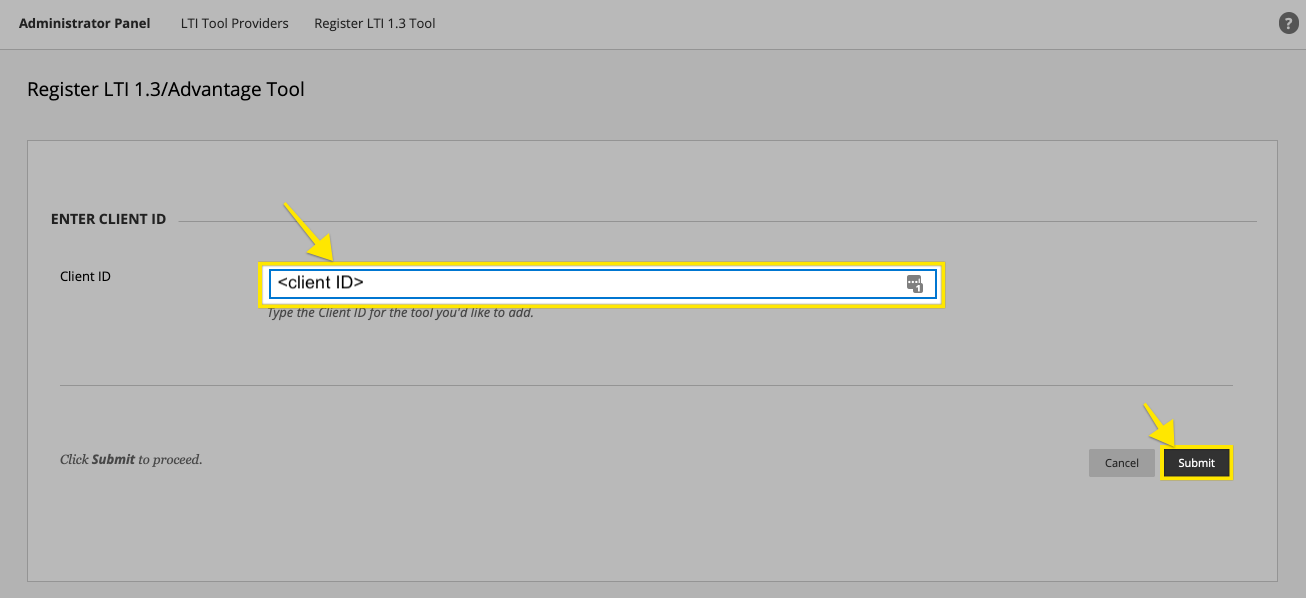
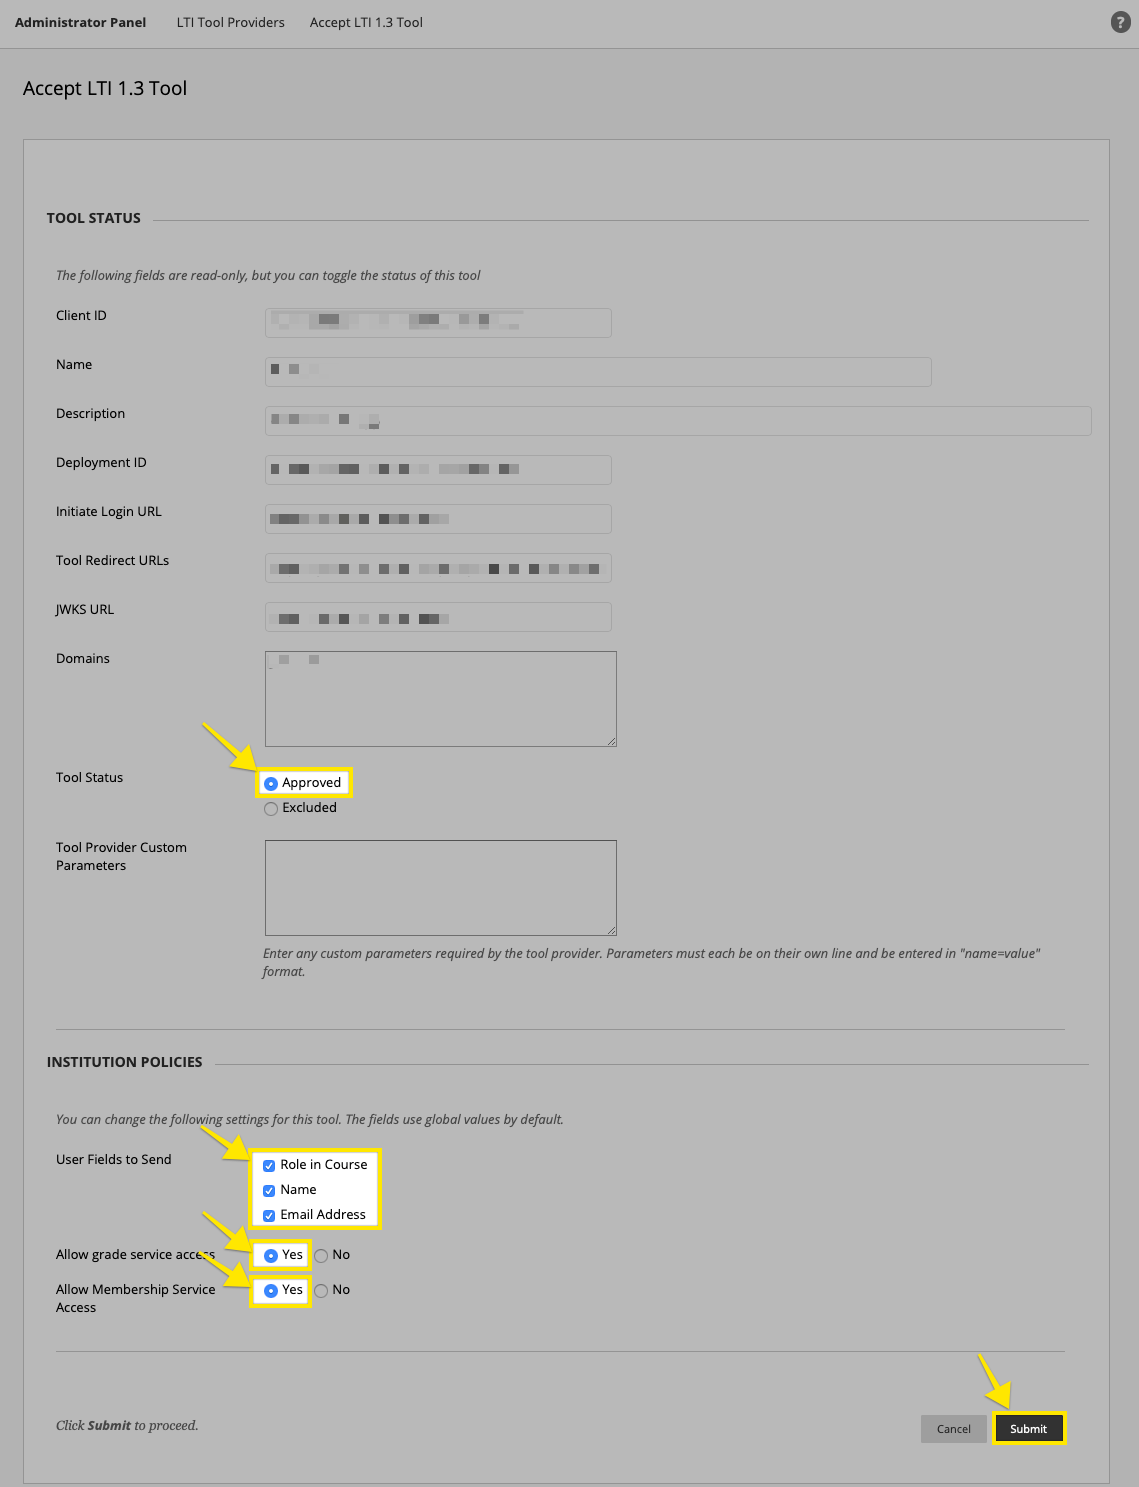
- This will bring you to a pre-filled 'Accept LTI® 1.3 Tool' form. Please make sure the following settings are changed:
- Tool Status: Approved
- User Fields To Send: Role in Course, Name, Email Address
- Allow grade service access: Yes (If you are using the LTIAAS Assignments and Grades service)
- Allow Membership Service Access: Yes (If you are using the LTIAAS Names and Roles service)
- Finally click 'Submit' at the bottom of the form.Blackboard accept LTI® tool form
Step 5. Setup a placement for the tool
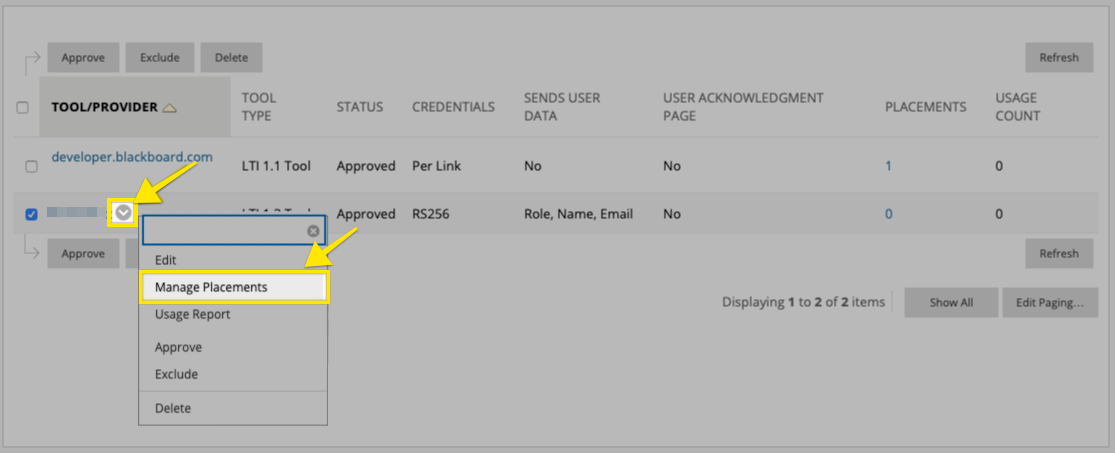
- Now that the tool is added to Blackboard, find it in the table on the 'LTI® Tool Providers' table. Hover over it's name and click on the small 'down arrow' to the right of the name. Then select 'Manage Placements' Manage placements menu link within the LTI® tool providers table
- Click the 'Create Placement' button on the resulting Manage Placements page. The create placement button

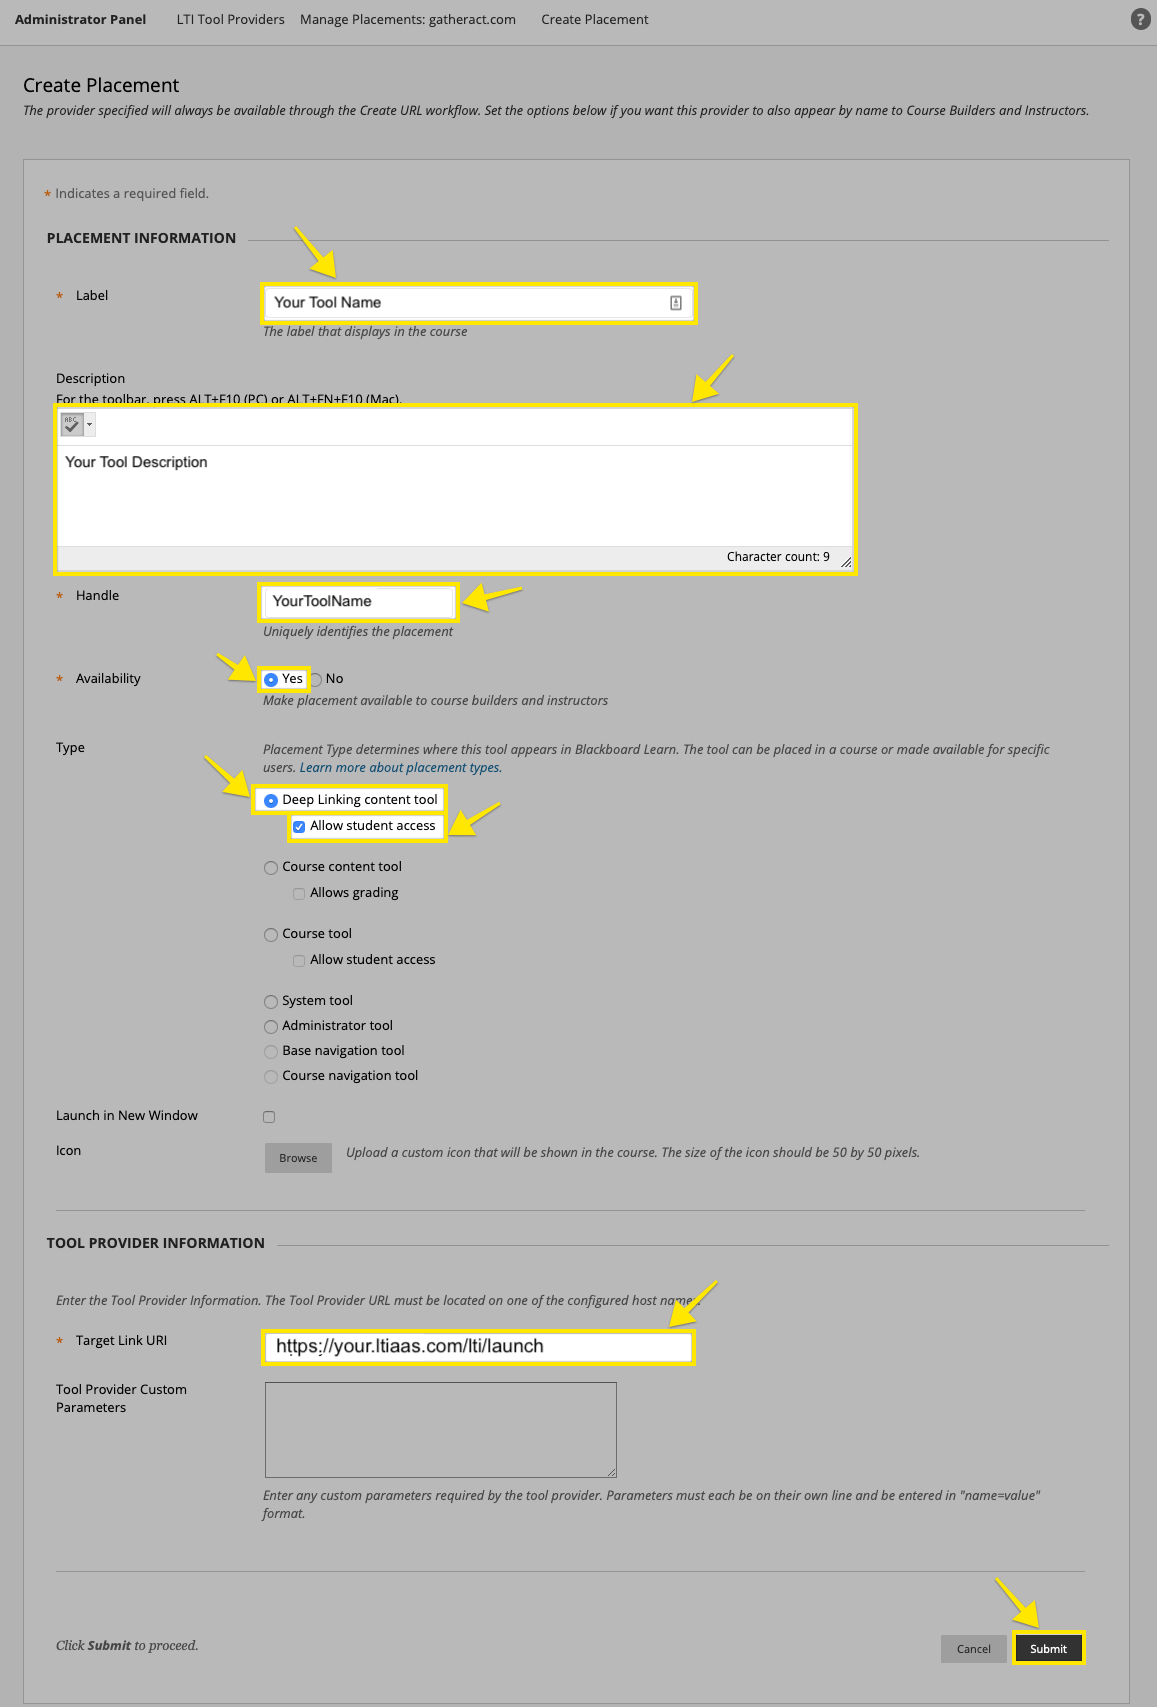
- Fill in the Placement form with the following information:
- Label:
Your Tool Name - Description:
Your Tool Description - Handle:
YourToolName - Availability:
Yes - Type:
Deep Linking content tool (+ Allow student access)<- If you are using the LTIAAS deep linking service. - Type:
Course content tool (+ Allows grading)<- If you are using the LTIAAS assignments and grades service. - Type:
Course tool (+ Allow student access)<- If you are using a basic LTIAAS launch only. - Target Link URI:
https://your.ltiaas.com/lti/launchThen click 'Submit'
- Label:
Step 6. Do a test launch
In Blackboard, go to a course and then select 'Content' in the left hand menu.
In the Content Page, select 'Build Content' -> 'Your Tool Name', where 'Your Tool Name' is the name of the tool name given inside Blackboard.
Blackboard build content menu inside a course
You should then see the app running inside blackboard.
If you get an error similar to 'The Tool Provider has been disabled by the System Administrator', there are a couple things you should check:
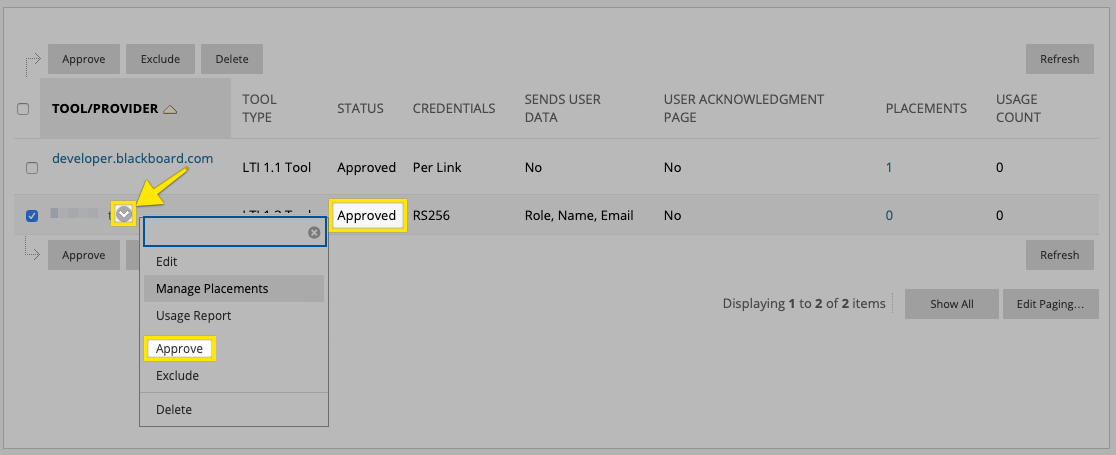
- Navigate to 'System Admin' -> 'Integrations' -> 'LTI® Tool Providers' and validate that the tool's State is 'Approved'. If it is not, click on the small down arrow next to the tool name and click 'Approve' Approving a tool in Blackboard
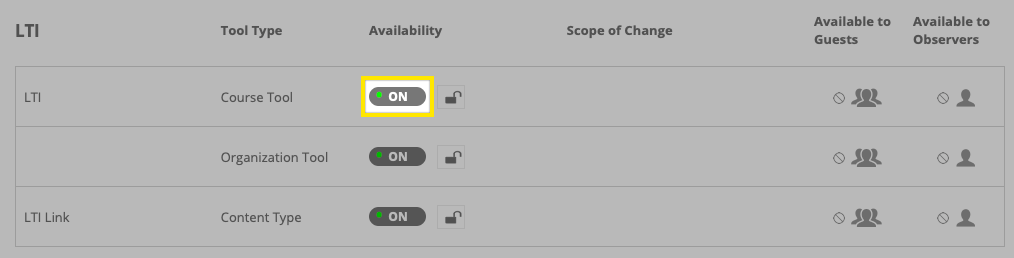
- Navigate to 'System Admin' -> 'Tools and Utilities' -> 'Tools' and search for a section labeled 'LTI®'. Make sure LTI® is enabled. Enabling LTI® within the Blackboard system admin menu
- Navigate to 'System Admin' -> 'Integrations' -> 'LTI® Tool Providers' and validate that the tool's State is 'Approved'. If it is not, click on the small down arrow next to the tool name and click 'Approve'
Next steps
Now that you have your LTI® tool set up in an LMS, you can start receiving LTI® launches. Please see the Receiving your first LTI® launch guide for more information.