Canvas
Starting August 2023, All Instructure-Hosted Canvas URLs (except the base URL field, i.e. the issuer) should be changed from https://canvas.instructure.com/... to https://sso.canvaslms.com/...
Any previous URLs that are currently working do not need immediate change, but you should consider updating these as they may not continue to work in the future (date to be determined).
The Instructure team has provided a detailed article on the URL change for Instructure-Hosted Canvas URLs. The instructions below have incorporated this change.
As of August 2024, Canvas supports dynamic registration. It also supports a semi-automated registration using JSON. This guide explains how to register an LTIAAS tool into Canvas with Dynamic Registration, the Automatic JSON method and manually.
Dynamic Registration
Summary
Canvas dynamic registration is only available for customers that purchase the dynamic registration feature.
To set up LTIAAS with Canvas using dynamic registration you need to:
Step 1. Add an LTI® Registration in Canvas
- Login to your Canvas LMS as an administrator.
- Navigate to 'Admin' -> [your account name] -> 'Developer Keys'
- Click the '+ Developer Key' button followed by the '+ LTI® Registration' dropdown Canvas add LTI® Registration button inside admin menu

- In the resulting form, enter your dynamic registration URL:
https://your.ltiaas.com/lti/register, whereyouris the custom subdomain set up in the LTIAAS portal; Then click 'Continue'.Canvas dynamic registration url input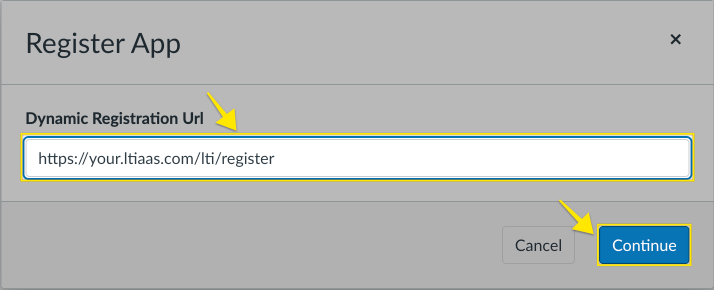
- (optional) If you have the Dynamic Registration Intermediate Target feature enabled, an iframe will launch with your intermediate target URL.
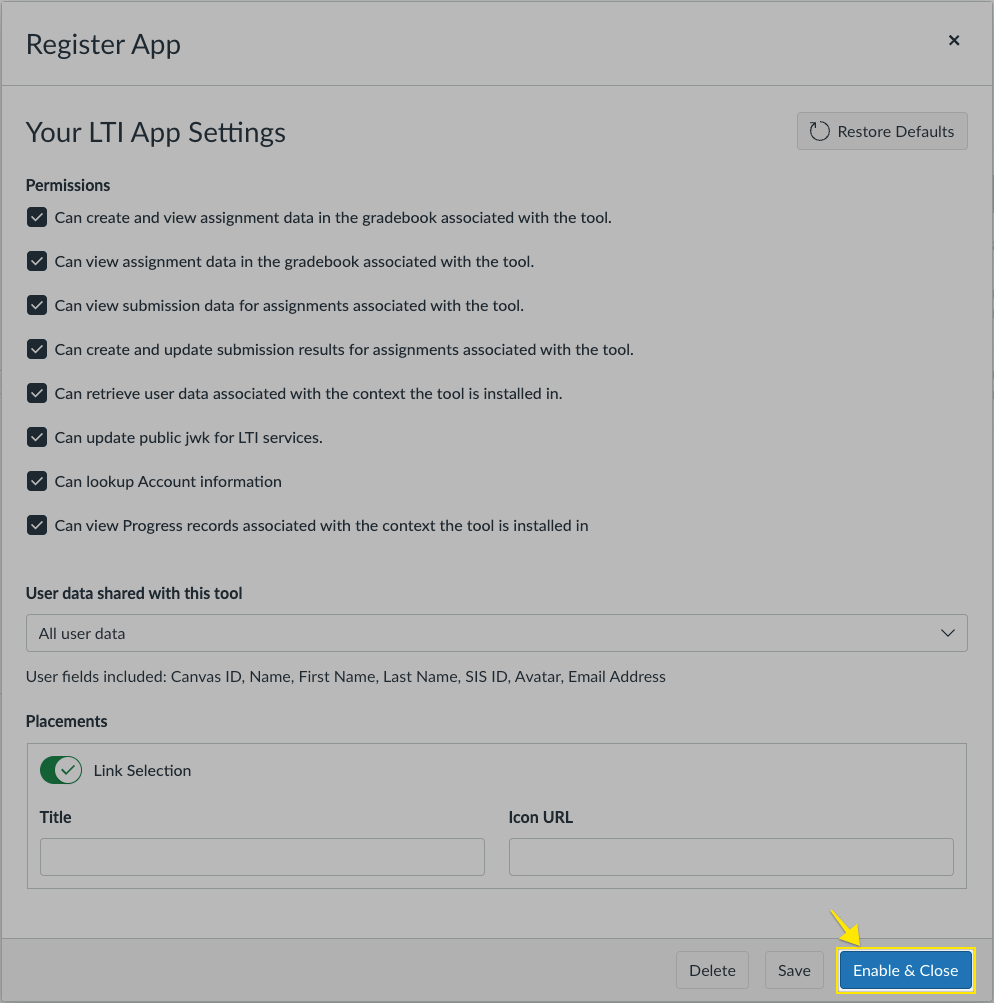
- Canvas will open a final settings dialog that the user can configure additionally if needed; Click the 'Enable & Close' button.Canvas dynamic registration settings
- After closing the dialog, find the newly registered tool's key on the list of keys and make sure the State is switched to 'ON'
- Note the number in the details column. It will be used as the
Client IDin the next stepsCanvas developer keys table with client ID highlighted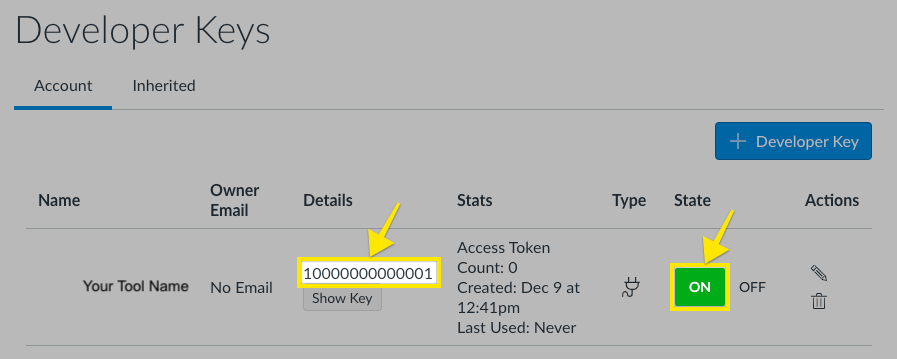
Step 2. Install the tool into Canvas
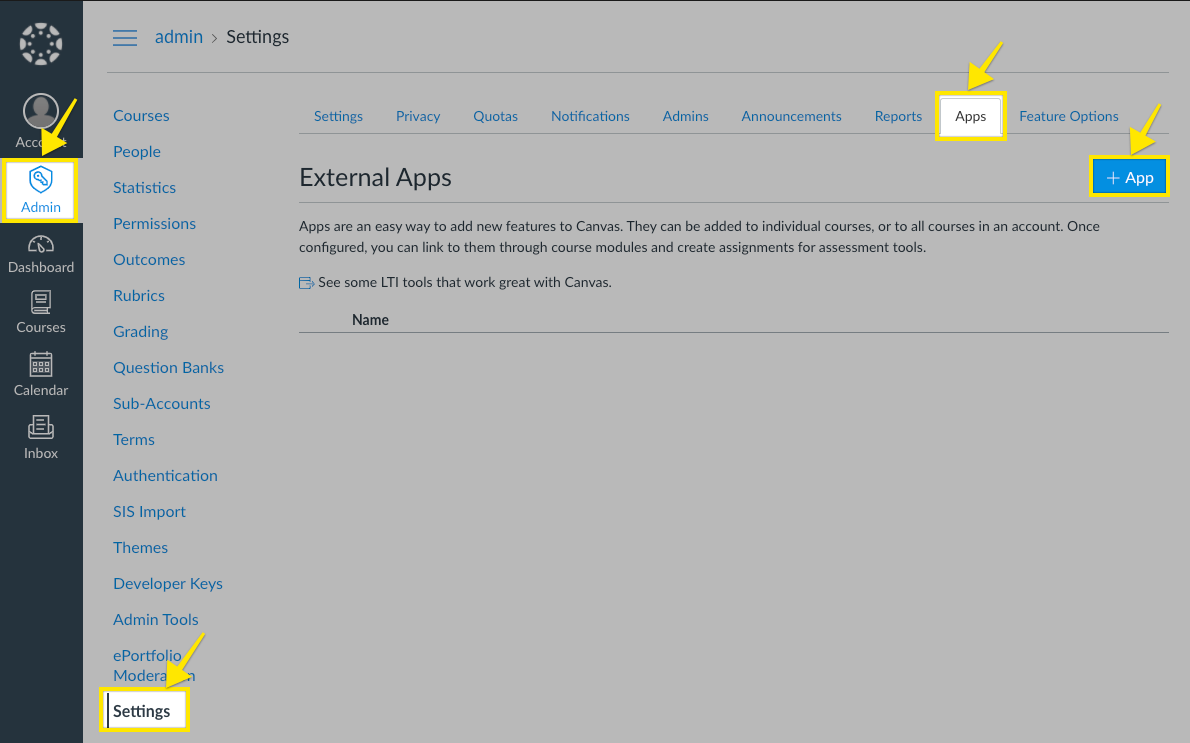
- In the Canvas Admin menu, navigate to 'Settings' -> 'Apps'
- Click the '+ App' button Canvas add a new app
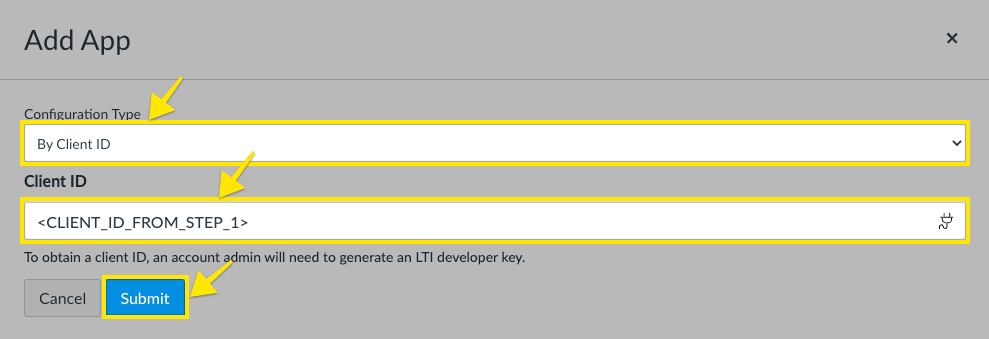
- In the resulting form choose:
- Configuration Type:
By Client ID - Client ID:
[The Client ID number you found in the previous series of steps]
- Configuration Type:
- Click the 'Submit' button Canvas submit add app form
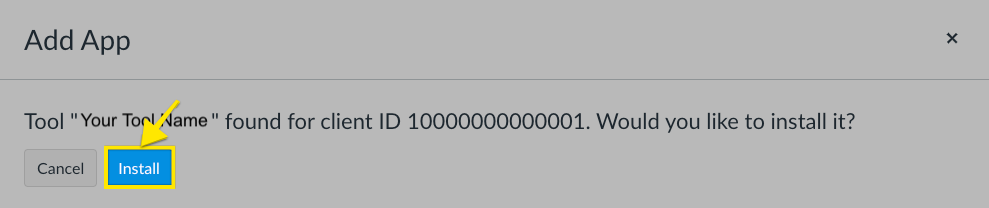
- In the resulting dialog, click 'Install' Canvas install app button
- The tool will now show up in the 'External Apps' table.
Step 3. Do a Test Launch
- Follow the instructions on the Canvas website to add an external tool assignment to a course: How do I add an assignment using an external app?
- When choosing an external tool, choose the newly registered tool from step 1.
Automatic JSON registration
Summary
Canvas automatic JSON registration is only available for customers that purchase the dynamic registration feature.
To set up LTIAAS with Canvas JSON you need to:
- Add a developer LTI® Key in Canvas
- Install the tool into Canvas
- Register the Canvas provided details into LTIAAS
- Do a test launch
Step 1. Add a developer key in Canvas
- Login to your Canvas LMS as an administrator.
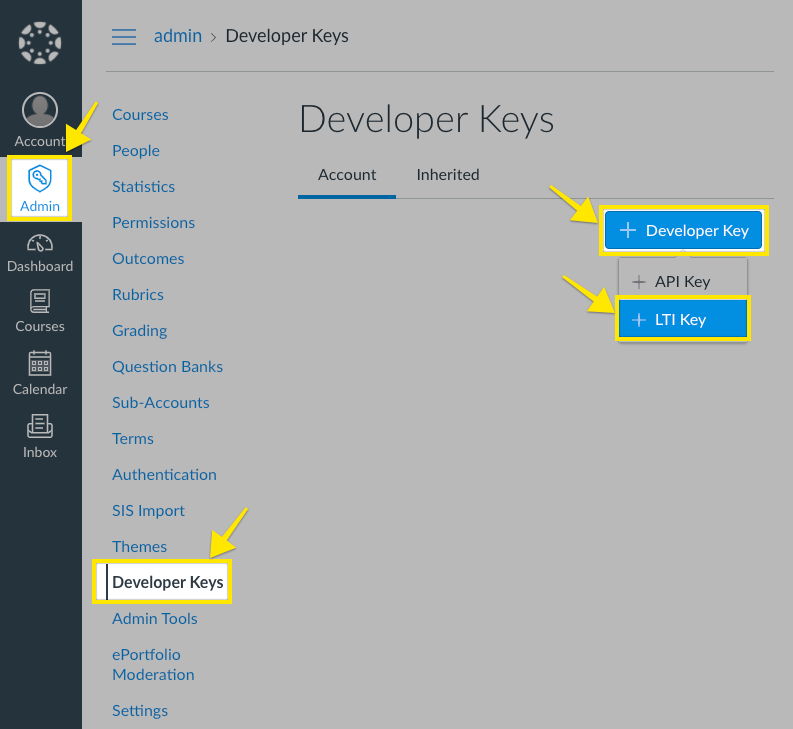
- Navigate to 'Admin' -> [your account name] -> 'Developer Keys'
- Click the '+ Developer Key' button followed by the '+ LTI® Key' dropdown Canvas add LTI® key button inside admin menu
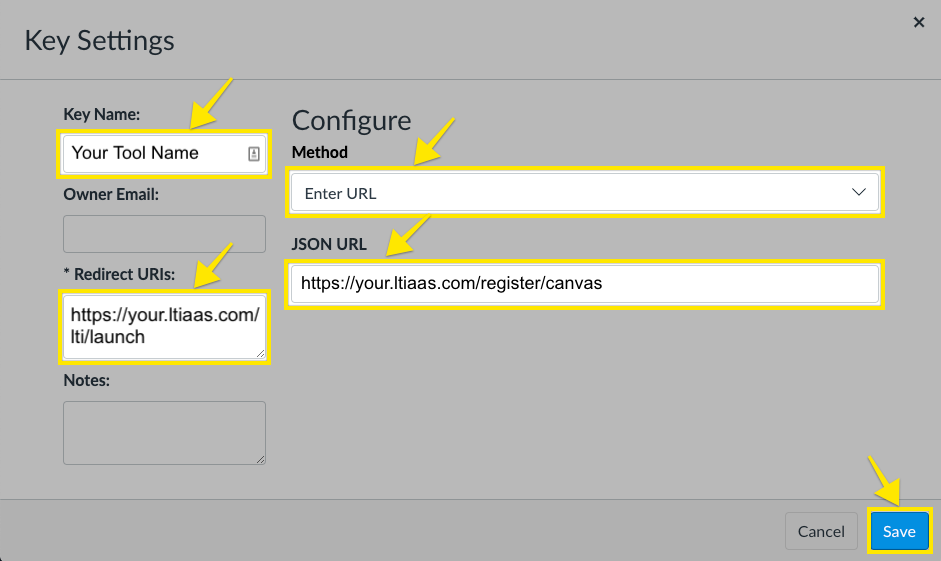
- In the resulting form, enter the following information:
- Key name:
Your Tool Name - Method:
Enter URL - Redirection URI(s):
https://your.ltiaas.com/lti/launch - JSON URL:
https://your.ltiaas.com/lti/register/canvas
- Key name:
- Click the 'Save' button at the bottom when the form is filled. Canvas save key settings
- After saving, find the newly registered tool's key on the list of keys and make sure the State is switched to 'ON'
- Note the number in the details column. It will be used as the
Client IDin the next stepsCanvas developer keys table with client ID highlighted
Step 2. Install the tool into Canvas
- In the Canvas Admin menu, navigate to 'Settings' -> 'Apps'
- Click the '+ App' button Canvas add a new app
- In the resulting form choose:
- Configuration Type:
By Client ID - Client ID:
[The Client ID number you found in the previous series of steps]
- Configuration Type:
- Click the 'Submit' button Canvas submit add app form
- In the resulting dialog, click 'Install' Canvas install app button
- The tool will now show up in the 'External Apps' table.
Step 3. Register the Canvas provided details into LTIAAS
A registration can be done within the LTIAAS Portal. Start by logging in to your account and navigating to the Registrations page. Then click on the + Add Registration button.

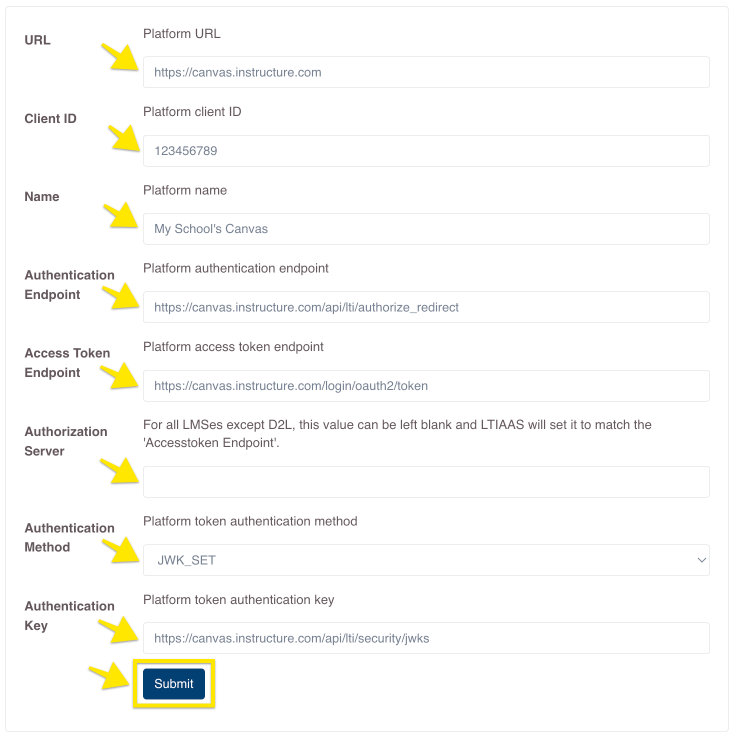
Enter the information that the LMS provides for its LTI® endpoints using the table below as a guide.
| LTIAAS Registration API Name | Canvas Provided Name (Instructure Cloud) | Canvas Provided Name (Self Hosted) |
|---|---|---|
| Name | Any name you would like that helps you identify your LMS | |
| Client ID | The client ID found in the first sequence of steps | |
| URL | https://canvas.instructure.com | https://[YOUR_CANVAS_URL] (or, at times) https://canvas.instructure.com |
| Authentication Method | JWK_SET | |
| Authentication Key | https://sso.canvaslms.com/api/lti/security/jwks | https://[YOUR_CANVAS_URL]/api/lti/security/jwks |
| Access Token Endpoint | https://sso.canvaslms.com/login/oauth2/token | https://[YOUR_CANVAS_URL]/login/oauth2/token |
| Authentication Endpoint | https://sso.canvaslms.com/api/lti/authorize_redirect | https://[YOUR_CANVAS_URL]/api/lti/authorize_redirect |
Replace [YOUR_CANVAS_URL] with the base URL of your canvas instance. For example: canvas.my-university.edu or canvas.instructure.com. More information about the Canvas LTI® 1.3 endpoints can be found on Instructure's website.
If a registration is not working, one of the likely causes is an incorrect URL. Please try both https://canvas.instructure.com and https://[YOUR_CANVAS_URL].
Click submit when you have made the necessary changes. Also, you can edit these values at any time.
Step 4. (Optional) Edit the registration
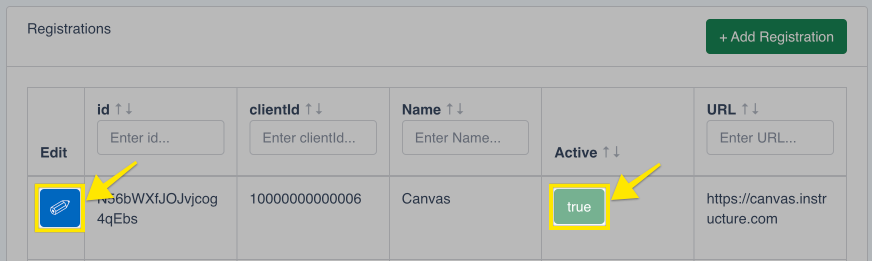
If at any time you want to edit or delete a registration, simply click on the blue pencil icon on the leftmost column of the table for the registration item you want to change.
By default, all new registrations are activated upon creation. There may be an instance where a platform was registered, but you don't want the registration to be active. You can activate/deactivate a registration by clicking on the true/false button on the Active column of the table.
Step 5. Do a test launch
You may need to add placements for the newly installed tool before adding it to certain places within the LMS.
- Follow the instructions on the Canvas website to add an external tool assignment to a course: How do I add an assignment using an external app?
- When choosing an external tool, choose the newly registered tool from step 1.
Manual Registration
Summary
To set up LTIAAS with Canvas using Manual Registration, you need to:
- Add a developer LTI® key in Canvas
- Install the LTIAAS tool into Canvas
- Register the Canvas provided details into LTIAAS
- Do a test launch
Step 1. Add a developer key in Canvas
Login to your Canvas LMS as an administrator.
Navigate to 'Admin' -> [your account name] -> 'Developer Keys'
Click the '+ Developer Key' button followed by the '+ LTI® Key' dropdown
Canvas add LTI® key button inside admin menuIn the resulting form, enter the following information:
- Key name:
Your Tool Name - Method:
Manual Entry - Redirection URI(s):
https://your.ltiaas.com/lti/launch - Title:
Your Title - Description:
Your Tool Description - Target Link URI:
https://your.ltiaas.com/lti/launch - OpenID Connect Initiation Url:
https://your.ltiaas.com/lti/login - JWK Method:
Public JWK URL - Public JWK URL:
https://your.ltiaas.com/lti/keys
Canvas configure manual tool form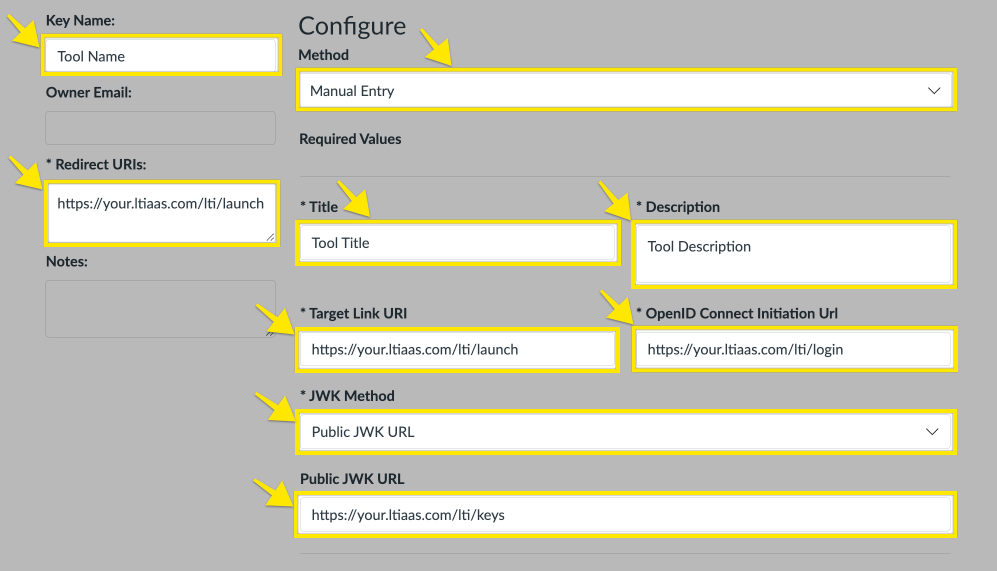
- Key name:
Further down in the form, select the services your tool needs. The screenshot below shows an example of a tool that uses assignments, grades, and the launch context (i.e. the course ID).
Canvas enable/disable LTI® services
Toward the bottom of the form, add placements for your tool. These are the locations in the LMS where your tool can be added. If you are using Deep Linking, select
LtiDeepLinkingRequest. Otherwise, selectLtiResourceLinkRequestfor a basic LTI® launch.Canvas add placements form with message type selection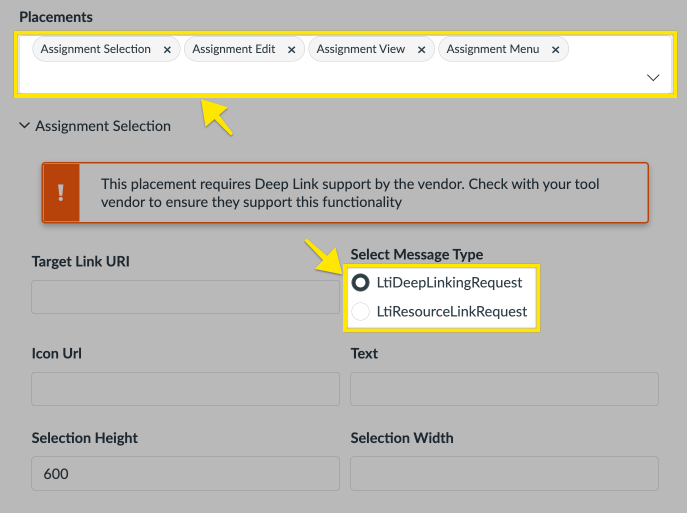
Click the 'Save' button at the bottom when the form is filled.

After saving, find the newly registered tool's key on the list of keys and make sure the State is switched to 'ON'.
Note the number in the details column. It will be used as the
Client IDin the next steps.Canvas developer keys table with client ID highlighted
Step 2. Install the LTIAAS tool into Canvas
- In the Canvas Admin menu, navigate to 'Settings' -> 'Apps'
- Click the '+ App' button Canvas add a new app
- In the resulting form choose:
- Configuration Type:
By Client ID - Client ID:
[The Client ID number you found in the previous series of steps]
- Configuration Type:
- Click the 'Submit' button Canvas submit add app form
- In the resulting dialog, click 'Install' Canvas install app button
- The tool will now show up in the 'External Apps' table.
Step 3. Register the Canvas provided details into LTIAAS
A registration can be done within the LTIAAS Portal. Start by logging in to your account and navigating to the Registrations page. Then click on the + Add Registration button.
Enter the information that the LMS provides for its LTI® endpoints using the table below as a guide.
| LTIAAS Registration API Name | Canvas Provided Name (Instructure Cloud) | Canvas Provided Name (Self Hosted) |
|---|---|---|
| Name | Any name you would like that helps you identify your LMS | |
| Client ID | The client ID found in the first sequence of steps | |
| URL | https://canvas.instructure.com | https://[YOUR_CANVAS_URL] (or, at times) https://canvas.instructure.com |
| Authentication Method | JWK_SET | |
| Authentication Key | https://sso.canvaslms.com/api/lti/security/jwks | https://[YOUR_CANVAS_URL]/api/lti/security/jwks |
| Access Token Endpoint | https://sso.canvaslms.com/login/oauth2/token | https://[YOUR_CANVAS_URL]/login/oauth2/token |
| Authentication Endpoint | https://sso.canvaslms.com/api/lti/authorize_redirect | https://[YOUR_CANVAS_URL]/api/lti/authorize_redirect |
Replace [YOUR_CANVAS_URL] with the base URL of your canvas instance. For example: canvas.my-university.edu or canvas.instructure.com. More information about the Canvas LTI® 1.3 endpoints can be found on Instructure's website.
If a registration is not working, one of the likely causes is an incorrect URL. Please try both https://canvas.instructure.com and https://[YOUR_CANVAS_URL].
Click submit when you have made the necessary changes. Also, you can edit these values at any time.
Step 4. (Optional) Edit the registration
If at any time you want to edit or delete a registration, simply click on the blue pencil icon on the leftmost column of the table for the registration item you want to change.
By default, all new registrations are activated upon creation. There may be an instance where a platform was registered, but you don't want the registration to be active. You can activate/deactivate a registration by clicking on the true/false button on the Active column of the table.
Step 5. Do a test launch
You may need to add placements for the newly installed tool before adding it to certain places within the LMS.
- Follow the instructions on the Canvas website to add an external tool assignment to a course: How do I add an assignment using an external app?
- When choosing an external tool, choose the newly registered tool from step 1.
Canvas placements
Canvas supports many different LTI placements. A full list is available in their developer documentation.
When registering your tool, you need to decide where you want your tool to appear within Canvas. Here are some common placements and when they might be used:
Assignment Selection
This is the most common placement. It is used when you want to use an LTI tool to generate a link or links that will be placed as an activity within a course. This placement supports a simple launch and deep linking.
Global Navigation
If your tool does not need to send grades and is simply used as a launch-point from with the LMS, you can use this placement to add a link to your tool in the main Canvas sidebar. This placement supports a simple launch only, not deep linking.
Course Navigation
If your tool does not need to send grades and is simply used as a launch-point from with the LMS, you can use this placement to add a link to your tool in a course's sidebar. This placement supports a simple launch only, not deep linking.
Course Assignments Menu
The Course Assignments Menu is used when your LTI tool is designed to use deep linking and the deep-linking process returns an array of LTI items. This placement supports a simple launch and deep linking, but is typically only used with deep linking.
Next steps
Now that you have your LTI® tool set up in an LMS, you can start receiving LTI® launches. Please see the Receiving your first LTI® launch guide for more information.